Model Tamiya Blazing Blazer, model number 58029, offered for sale in 1982 and available on the market until 1984 Styrene body 3-speed chassis This is probably one of the most famous models made by Tamiya.
Analysis of the model to be restored The starting point for this restoration at first glance could not be better. The model is certainly incomplete, but what is in the lot is in excellent condition. From the pictures in the offer, it looks new.
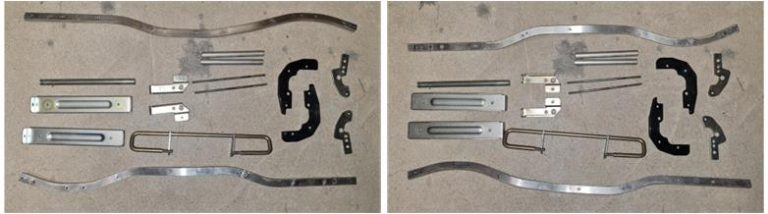
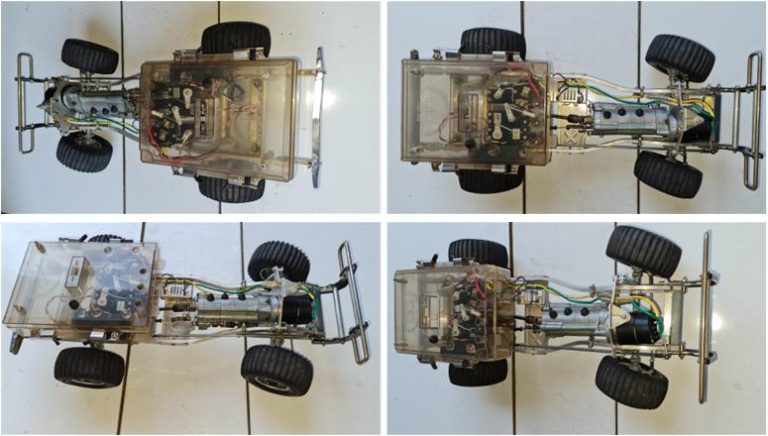
Visual analysis of the model we have just received confirms that it is new; the pictures below show the view of the frame from below (left) and above (right); there are no signs of wear, cuts, scratches, rust, dirt or damage. It looks like the chassis was built and then abandoned on a shelf. All the mechanical part is there, all the electrical part is missing: the transparent plastic box holding the electronics, the speed regulator and the electronics.
The pictures below show the view of the body from above (left) and below (right); there are no signs of cracks or scratches. As for the chassis, it appears that the body was painted black and then abandoned on a shelf. All the accessories that complete the body are missing: front grille with lights, steering wheel and roll bar with wing.
The model is certainly a milestone in Tamiya’s production; today (2024) it is difficult to find 58029 models that have never circulated; restored or preserved models can be found. To complete the restoration you need a lot of parts, which must be of very good quality so as not to reduce the value of the restoration. The image below shows the parts available for this restoration; the search for these parts took months and they stand out:
– red roll bar and wing, very well preserved, – electronics box with its black linkages complete with servo system – 6 volt battery
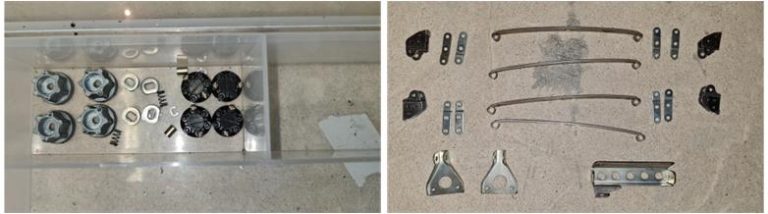
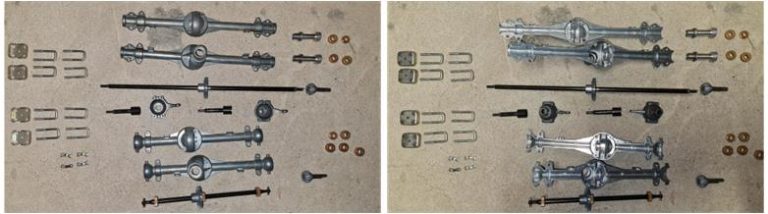
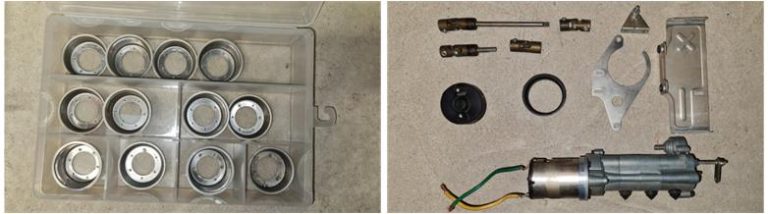
The following pictures allow an analysis of the individual batches of parts available for this restoration work, divided into chassis, axles, electronics, body. In the picture on the left starting from the left moving to the right: several rear axle metal shells, number three rear axles, number four collars, one hub, several linkages, complete rear bumper, leaf spring suspension plates. In the picture on the right from the left moving to the right: transparent plastic box for electronics – battery in very good condition, metal servo holder system, various black plastic cam systems, linkages of various lengths, steel clips for closing the electronics box, Toyota Pick Up model number 58028 rev regulator which was an accessory for Blazing Blazer model number 58029 and mechanical rev regulator as standard on the Blazing Blazer complete with dual-element electric heater. This last part has certainly seen better times. What is available and the starting condition make it possible to think of a complete restoration that would bring the model back to the state it was in as soon as it left production.
In the picture on the left starting from the left going to the right: battery, wing with roll bar, front grille and driver. The driver is an accessory still available today (2024) in the Hop-Up Options series as set number 54416 ‘4×4 Vehicle Driver Figure Bruiser’. The worst-off part of this restoration is the front grille, which is a very rare piece, as is any part of this model. The grille is original, but it has been modified by drilling holes in the left and right headlights to presumably install the lights and the two side pins for attaching it to the body are also missing. In conclusion, this last part has certainly seen better times, but the starting condition allows one to think of a complete restoration that does not affect the restoration of the model.
The conservative restoration of this model is feasible considering what was received in the starting lot and with what was available to complete the body.
Chassis restoration The first operation is to disassemble the chassis to check each of its parts; at this stage look for broken parts, missing parts, modified parts, screws that do not unscrew – remove the four wheels with their hubs,
– disassemble front axle with its leaf spring suspension, which includes the steering system. All steering linkages are missing from the original model. – disassemble rear axle with its leaf spring suspension and
– Dismantle the solid spar chassis with its cross-members and bumper. The front and rear axles are completely free of grease or oil in the gears and bushings; the gears are intact and still have the burrs typical of newly moulded or manufactured parts.
– metal rims, gearbox, axles, electric motor support, … are all parts that will not be dismantled further. Visual inspection confirms that the parts are new and have never been turned.
Since all parts are new and scratch-free, the only activity that will be carried out is a careful cleaning with a cloth to remove the layer of dust that has clung to the metal parts. Analysis of the parts confirms that this is not necessary:
– wash with hot water and soap, – use the ultrasonic washing machine or/and – polish the parts with polish or toothpaste.
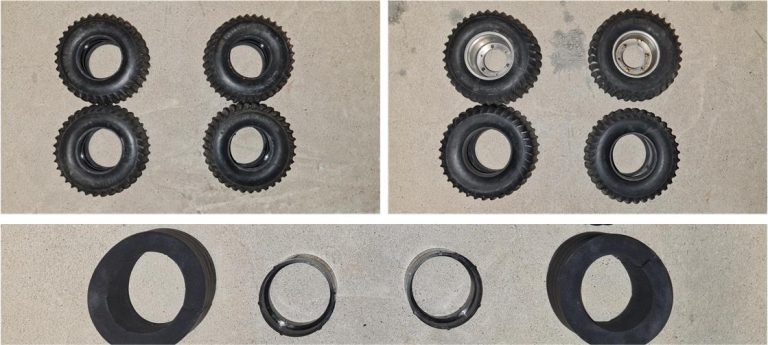
The parts are so new that you would have no positive effect, you would only remove the patina of time that took years to form. Nuts, bolts, washers, screws, pins and small parts in general are in very good condition; nothing seems to be missing, but original spare parts are available in the parts accumulated for this restoration. Screws, nuts and bolts have not been tightened strongly, which confirms that this model has never been turned. It looks as if someone either built it and then cannibalised the parts or stopped construction when it was almost completed. The four wheels are complete with the two rubber and hard plastic inserts (lower part of the photo) to make the wheels more rigid. This was necessary because the shoulder of the tyres chosen by Tamiya is not strong enough to support the weight of the model in motion. The rubber and plastic inserts are in excellent condition, the tyres, on the other hand, have cracks on the shoulder of the rubber itself, but only in certain sections of the side circumference. This confirms that the model has been stationary for a long time on a shelf and the tyres have been damaged in the section that they touch, they have not become ovalised just because of the inner inserts. Given the perfectly preserved state of the chassis, it is best to replace the four tyres mounted on the model (left image above) with four replacement tyres from the period (right image above) that are practically new. Two of these four tyres are also fitted with metal rims, rims that will not be used for this restoration as the four fitted to the model are scratch-free.
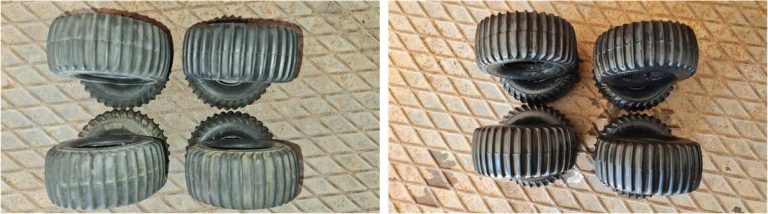
The first task to be performed is the regeneration of the rubber parts with glycerine. this operation takes between 20 and 25 days; it should be started first to avoid delaying the completion of the restoration. The wheels have a thin layer of dust that has accumulated over the years, dust that is now so adherent to the rubber that it cannot be removed by wiping it off (photo left). Prepare the tyres by washing them with warm water and detergent kitchen soap, which removes all dirt, grease and dust (photo right).
Take advantage of this phase of the restoration to treat all rubber parts on the model. In this case there is only one other part referred to in the manual as the ‘motor cover’. This is a cylindrical rubber sheath that serves to protect the electric motor and motor wiring from dust and drops of water. The previous owner split this cylinder in two; the front part protects the wiring harness, the rear part is a rubber cylinder that insulates the junction between the electric motor and gearbox.
Soak the rubber parts in glycerine for about ten days. During this phase, the glycerine fills in the gaps left by the rubber particles over time and restores elasticity to the rubber (picture on the left in the picture, you can see the two parts of the ‘motor cover’ in the bottom left-hand corner). Glycerine poorly digests water and moisture, so to prevent the glycerine from losing its regenerative properties, the container to be used for this operation must be able to close. There are eight medium to large wheels; when it is not possible to find a sufficiently large container with a cap, one solution is to use a transparent plastic kitchen foil to seal the container. Apply the foil in such a way as to close the container and then use painter’s tape to secure the foil and seal the container (photo on the right of the picture).
After this treatment, let the rubber parts rest and wait a week for the gums to emulsify all the excess glycerine absorbed. The gum should be left in a container on the bottom of which a paper towel is placed and the paper towel on which it is placed should be replaced every day. When the gum stops emulsifying glycerine, it should be left to rest for another seven days, wiping it daily with kitchen paper, at which stage the last excess glycerine absorbed by the gum is removed and the gum becomes shiny and elastic again. It takes three almost four weeks to complete the job.
With all parts intact, the construction phase of the model is relatively simple; the chassis is a reproduction of a real off-roader, yet assembling the parts is quick and straightforward. Sequence of images showing the stages in which the chassis is assembled.
– construction of the chassis with cross-members, the chassis is complete with all the linkages and towers for handling the leaf springs. The central cross-member is used to support the gearbox and the rear cross-member is the bumper;
– assemble the front and rear axles and install the leaf spring suspension system on the chassis;
– install the front and rear axles, the gearbox with the electric motor carrier plate and the front bumper on the newly completed chassis;
– assemble the wheels with the internal reinforcement to the metal rims and then install the wheels on the frame;
– assemble electronics consisting of three servos and a receiver on the metal yoke, which also serves as a support for the mechanical speed regulator; install this system inside the transparent plastic shell by installing the four metal clips for closure.
– Install the electronics box on the chassis; the chassis is now ready to receive the body in marriage.
Body restoration Basically, the body and wing are intact, the front grille has been modified to accommodate the lights and the two side plates to fix the screws are missing.
Body, wing and roll bar are intact and the present paintwork is in excellent condition. It is not necessary to remove this state of paint, which can serve as the basis for the final paintwork. The only thing to do is to clean these parts as best you can to remove dirt and grease. According to the manual, the correct colour to apply to each part is as follows
– black TS-14 to the body; this is the same as now, – matt black TS-6 to the wing supports – roll bar and front grille and – aluminium grey TS-17 to the wing
The damage to the front grille can be repaired by cutting two discs with the same diameter as the two headlight holes out of a 2 mm thick ABS sheet. Use the grille itself as a template to cut out the two discs. Cut out the two parts and then machine the side surfaces with sandpaper to fit the discs to the parts to be rebuilt.
Cut the two screw supports out of the 2 mm thick sheet, weld the two headlights and the two supports to the front grille using the less dense solution of Acetone and ABS; the less dense solution remains where it was applied with the brush. The solution does not solidify immediately and this allows time for the parts to be positioned.
Remove the wing from the roll bar and clean the parts with alcohol.
Apply matt black TS-6 to the grille, grey X11 simulating chrome to the headlamp surround – to the two rectangles below the headlamp – to the grille and yellow X8 to the central manufacturer’s logo.
The driver can be coloured as desired, there are no instructions in the manual.
Apply matt black TS-17 to the roll bar, aluminium grey TS-6 to the wing, brown XF10 to the seats.
The body is now complete and ready to receive stickers.
Restored model Pictures showing the finished model.
Tamiya, original figure, box art, guide book and catalogue are of TAMIYA INC, which does not endose or sponsor www.tamiyaclassic.com. Any brands, logos and trademarks represented on this website are the copyright of their respective owners.