Tamiya TA03F Pro David Jun 58200, item number 58200 released in 1999 to commemorate the victories achieved by this chassis in various championships:
– NORRCA National Champion (National Organization for Racing Radio Controlled Autos, which organizes radio-controlled car races in the United States and Canada, dividing participants not only by model classes but also by driver type, distinguishing between professional and non-professional categories) in the 4WD Touring category in 1996, – ROAR Champion (Remotely Operated Auto Racers or Radio Operated Auto Racing, which organizes radio-controlled car races in the United States and Canada) in 1997, – NORRCA Champion in 1997, – TCS Champion (Tamiya Championship Series) in 1997.
Body absent because it is a chassis-only model. Chassis TA03F Pro.
Analysis of the model to be restored
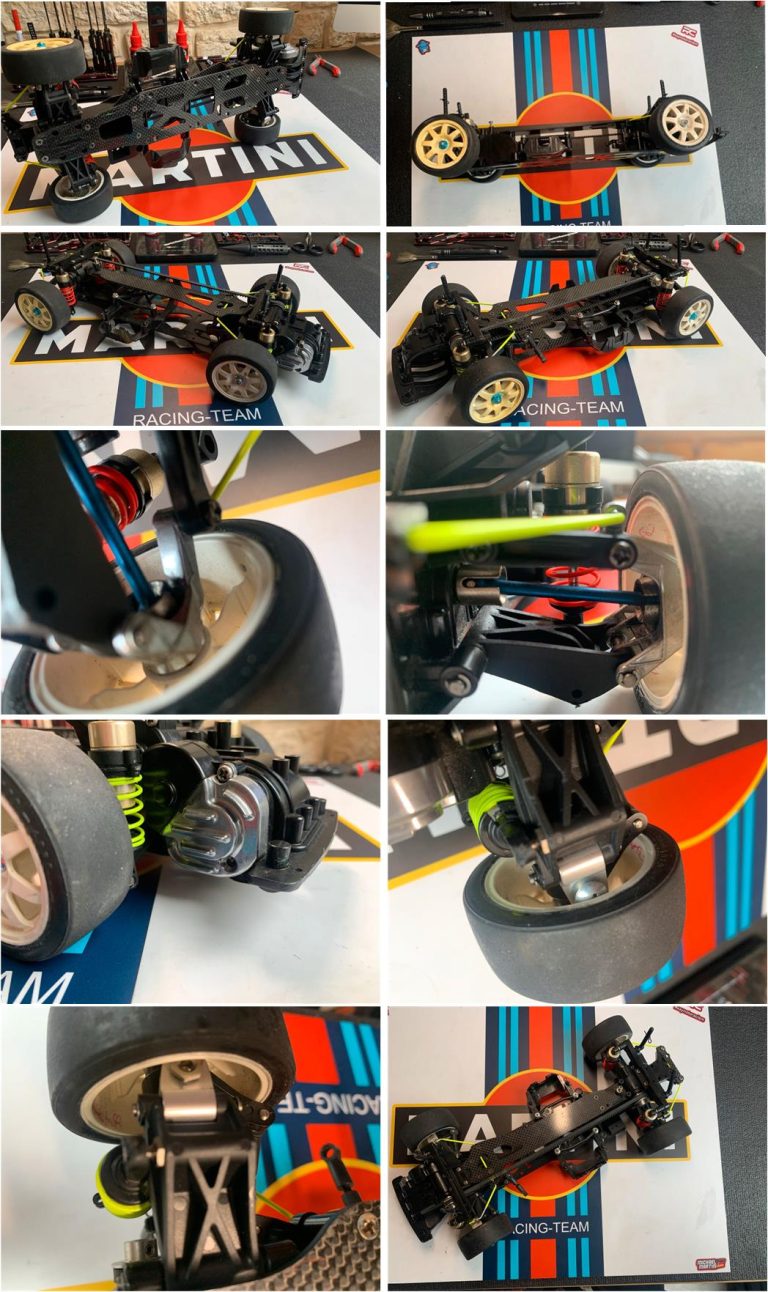
From the analysis of the model, it is evident that the chassis has raced on track; in fact, this model is among the most high-performing of the TA03 family with front motor. Those who buy this series aim to race on track and finding a new or perfectly preserved chassis is almost impossible because models for sale generally show signs of heavy use in competition. When purchasing a TA03F Pro David Jun, one must take into account the track use it has certainly undergone and also that (although many performance-enhancing accessories are included in the factory package) buyers usually further enrich the equipment with additional accessories, completing the already long list of items installed as standard. The images below come directly from the listing.
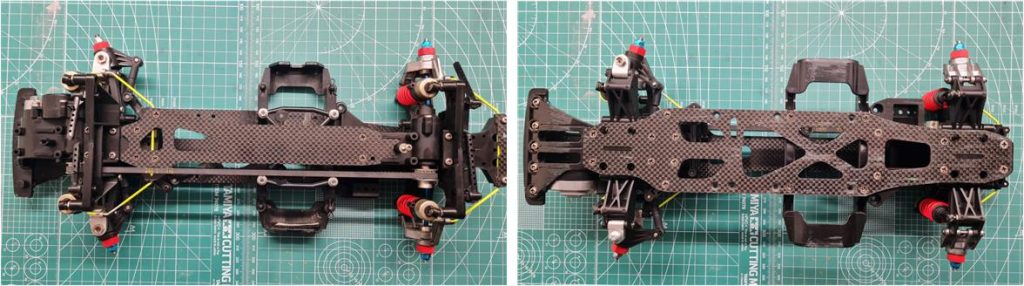
The chassis has been excellently preserved by the previous owner (see image on the left). Inspection of the upper part of the chassis shows no signs of wear. The chassis has been used on track (see image on the right); there are some marks on the lower plate, on the front plastic section and on the two plastic battery holders. The marks are caused by debris on the track that cut into the chassis, leaving visible lines. Given the pattern of the marks, it is clear that the chassis ran on a track with a very smooth surface. The marks are few and relatively shallow.
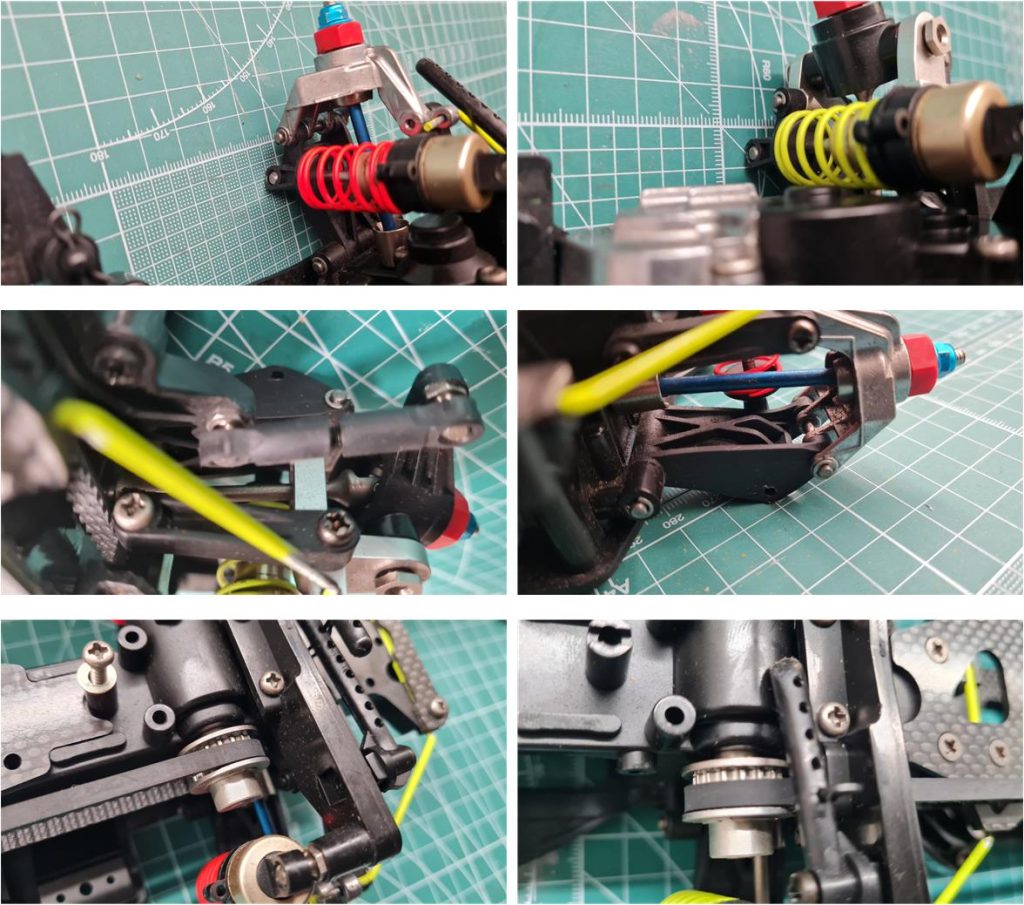
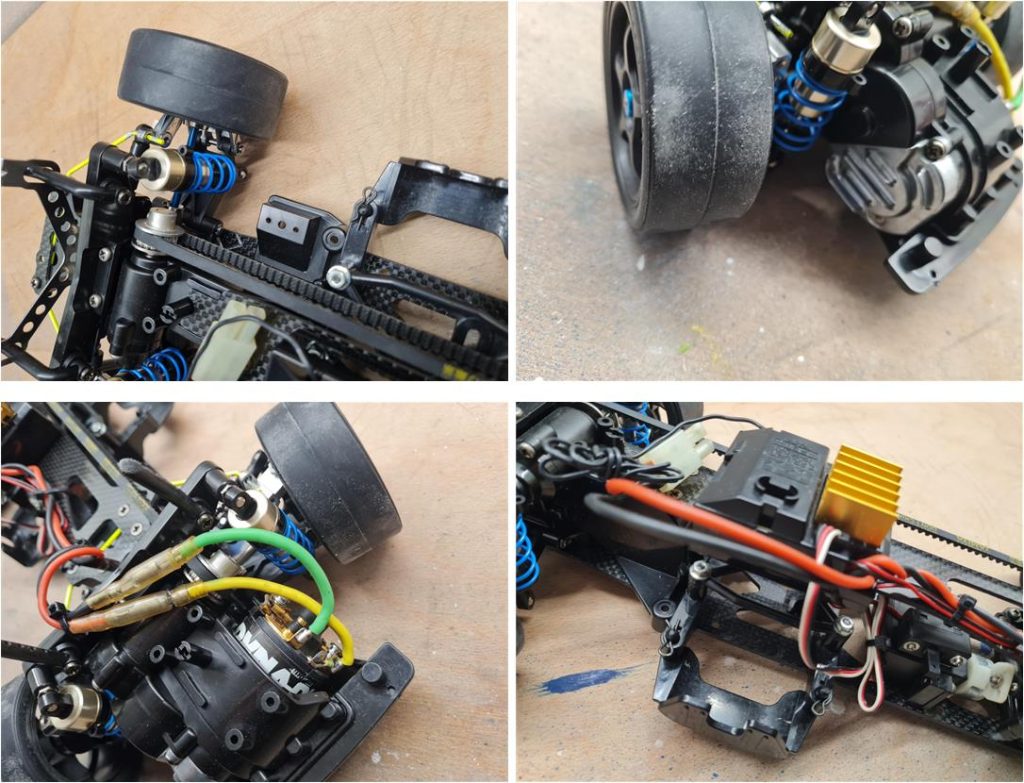
From the images it is possible to verify whether the chassis in question is a TA03 Pro or the rare TA03 Pro David Jun. By analyzing the photos, one can identify accessories that enhance performance, typical of one or the other model. In the first row of the image below, two parts can be observed that might also have been added later to modify a TA03F Pro into a TA03F Pro David Jun:
– Front C-hub in aluminum to reduce the suspended mass of the suspension and improve mechanical strength (on the left in the image). This hub is available as a performance-enhancing accessory; accessory code 53316 described as “TA-03 front hub carrier 1 pair.” – Rear hub in aluminum to reduce the suspended mass of the suspension and improve mechanical strength (on the right in the image). This hub is available as a performance-enhancing accessory; accessory code 53288 described as “TA-03 aluminium rear up right 1 pair.”
In the second row of the image below, the two anti-roll bars can be observed. These are absent on the TA-03F chassis but present on the TA03F Pro. The rear bar is fixed with a carbon plate (image on the left of the second row); this accessory is described as “TA03 carbon stabilizer support” corresponding to code number 53312. In the third row of the image below, two parts can be observed that might also have been added later to modify a TA03F Pro into a TA03F Pro David Jun:
– Reinforced drive belt in Aramid fiber, which is synthetic and resistant. This fiber is used in protective tear-resistant clothing, aerospace and construction. With this belt, the use of a belt tensioner can be avoided. The belt is available as a performance-enhancing accessory; accessory code 53297 described as “TA-03R-S Aramid fiber reinforced drive belt short.” – Aluminum motor heat sink (highlighted in blue in the image) to better dissipate the heat of electric motors used in racing. The plate is available as a performance-enhancing accessory; accessory code 53275 described as “TA-03 aluminium motor heat sink.”
Would you like me to create a clear comparison table listing the differences between the TA03F Pro and the David Jun edition, including these specific accessories?
In the first row of the image below, the shock absorbers can be seen, which might also have been added later to modify a TA03F Pro into a TA03F Pro David Jun. The four aluminum low-friction dampers with red and yellow springs have the same dimensions for both the front and rear axles; the set of four dampers is available as a performance-enhancing accessory, code 53280 described as “TA-03 super low friction damper set 4 pcs.” In the second row of the image below, the axles can be seen, which might also have been added later to modify a TA03F Pro into a TA03F Pro David Jun:
– Front drive shafts in a single piece (on the left in the images) – Rear drive shafts in anodized light alloy (on the right in the images)
In the third row of the image below, two parts can be seen that might also have been added later to modify a TA03 Pro into a TA03 Pro David Jun: the two 16-tooth aluminum pulleys (pulley code 53286) designed to reduce wear on the belt and pulleys themselves, while minimizing play in the front-to-rear transmission. Would you like me to compile all these accessories into a structured comparison chart that highlights which components are standard on the TA03F Pro and which are distinctive of the David Jun edition?
All these accessories are part of the standard equipment of the David Jun version chassis. In addition, the following are present:
– Axle pins for the four suspension arms with E-clips – Ball bearings – Double carbon chassis, an evolution of the FRP chassis from the TA-03F Pro version – All steel parts are chrome-plated – All plastics are black instead of dark gray, most noticeable in the front and rear gear case plastics. Tamiya keeps the original gray color in all other TA-03R, TA-03F, TA-03R-S, TA-03F-S and TA-03F Pro models. Tamiya changes the plastics to black only for the TA-03F Pro Special, TA-03R TRF and TA-03RS TRF chassis. The plastics retain the same part codes (for example, the motor case code is 50698), but Tamiya created a special black version that is unavailable on the market.
To complete the standard equipment, the steering saver with metal impact rings is missing, which replaces the TA-03F Pro version that has only one Teflon ring. Code 50473 described as “Rc Hi-Torque Servo Saver.” The manual specifies installation of the one-way bearing in the front gearbox, corresponding to set number 53298 defined as “TA03F torque control unit.” Only by inspecting the model directly was it possible to verify that this part is missing. The front one-way bearing is often replaced with the base version for handling reasons: under braking, the one-way bearing installed at the front makes the 4WD chassis react very similarly to a 2WD rear-wheel-drive chassis, causing grip issues but improving the chassis’s ability to rotate. See the guide on the one-way bearing for the TA03 chassis. Moreover, it is a component that requires frequent and constant maintenance to avoid losing functionality. After analyzing each part, it is possible to confirm that this is an original David Jun chassis that requires a general restoration, replacing all missing parts to return it to factory condition.
Chassis Restoration
The lot did not include:
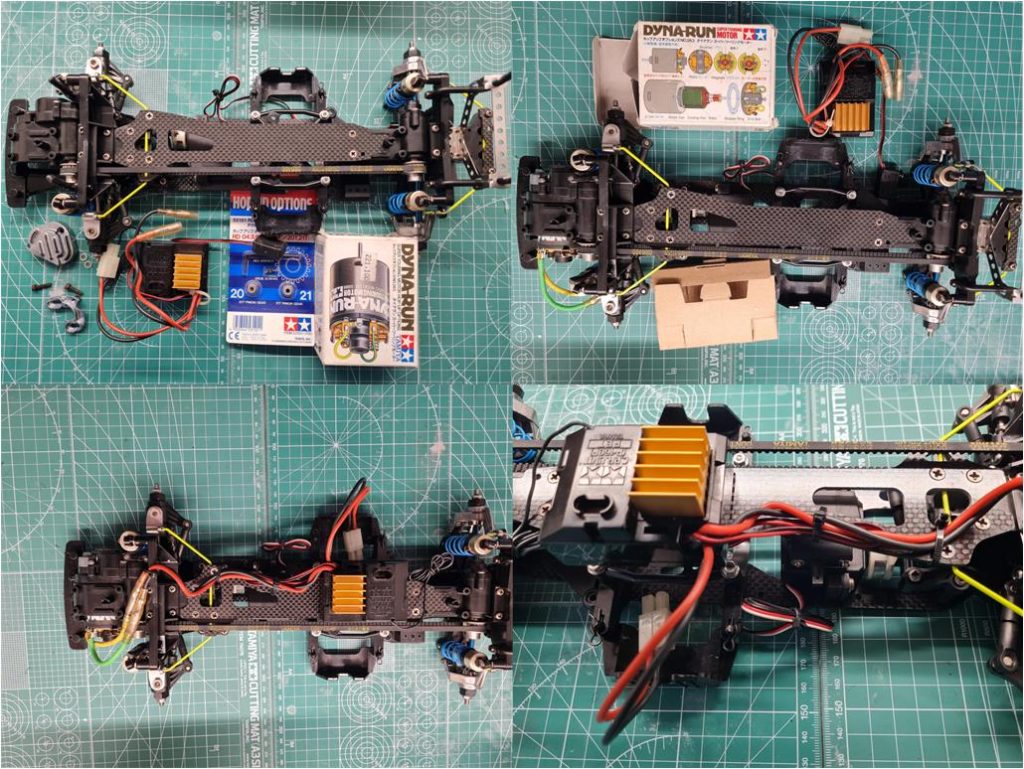
– Electronics – Steering saver – Servo mounting posts for steering – Electric motor
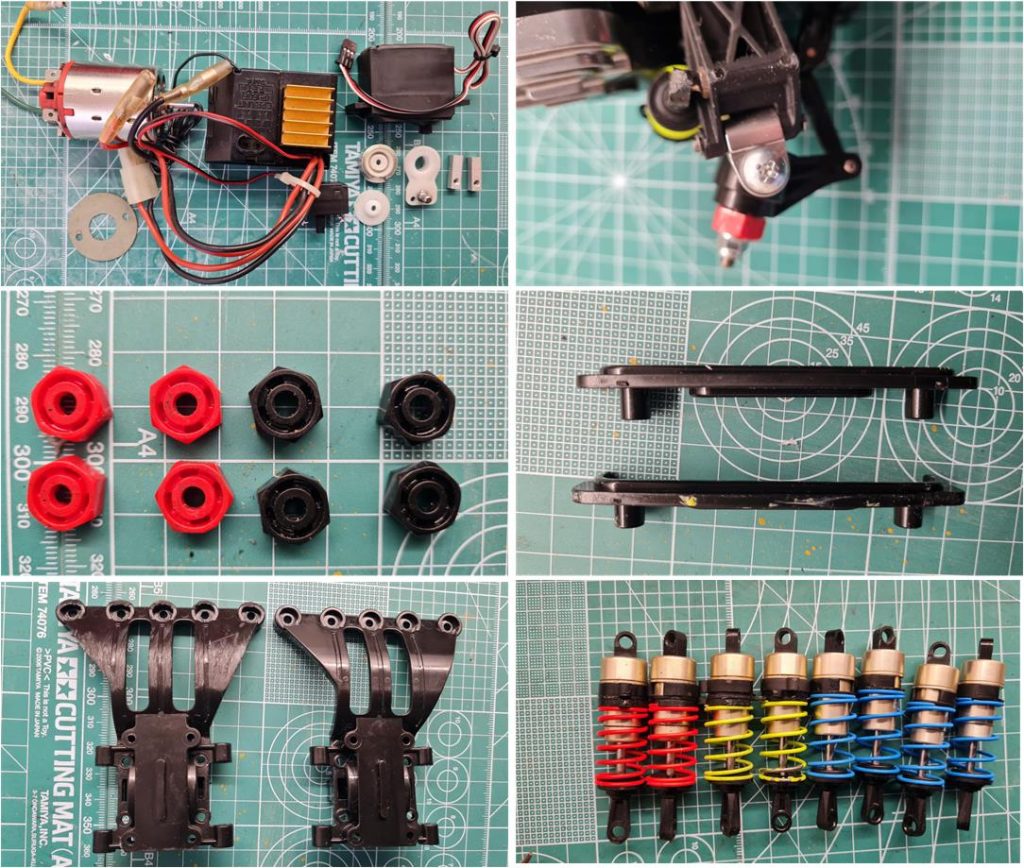
The integrated receiver and speed controller suggested by the instruction manual is the CRP Unit P160F version. This unit includes the steering servo. The lot also lacks the steering saver, which for chassis 58200 is a special version with three metal rings. This lever is difficult to find on the market but is available among the spare parts for this restoration. The two black plastic posts for installing the servo are absent; they are easily found as spare parts because they are common to other models. Electronics are available (image on the left of the first row), complete with a high-performance Dyna-Run Racing Stock motor, code number 53272. One steering pivot needs to be replaced because it is not made of light alloy and has a cross-head instead of a hexagonal head (image on the right of the first row). This part will be evaluated together with all the small hardware after disassembling the entire chassis. The red hex pins (image on the left of the second row), probably from the TA01 or TA02 chassis, are replaced with equivalent black ones. The plate installed on the front bumper (image on the right of the second row) is replaced with an identical but new part. The one installed on the model showed signs of frontal impacts. The same situation applies to the lower part of the gearbox case (image on the left of the third row), which had several scratches and was replaced with an equivalent but new part. The shock absorbers installed on the model are low-friction with red springs at the front and yellow springs at the rear; they showed signs of wear and were replaced with equivalents that show no wear and have the correct blue springs included in the factory base equipment (image on the right of the third row).
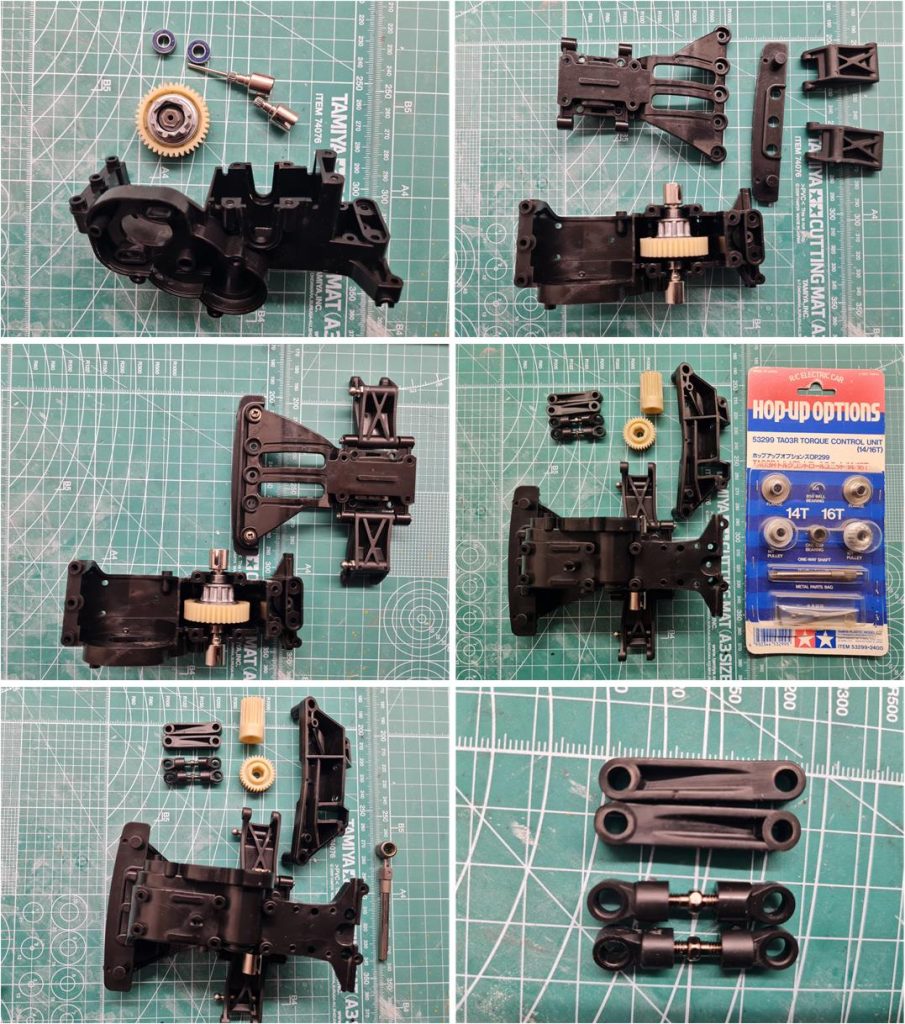
Disassembling the chassis makes it clear that the one-way bearing installed in the front gearbox is missing. This part can be found on the market as set number 53299 described as “TA03R Torque Control Unit.” This part is designed for the rear mid-motor chassis, but the one-way bearing can also be installed on the TA03F chassis. The two pulleys, however, cannot be used on a TA03F chassis. The pulleys installed on the model are correct, so they do not need to be replaced.
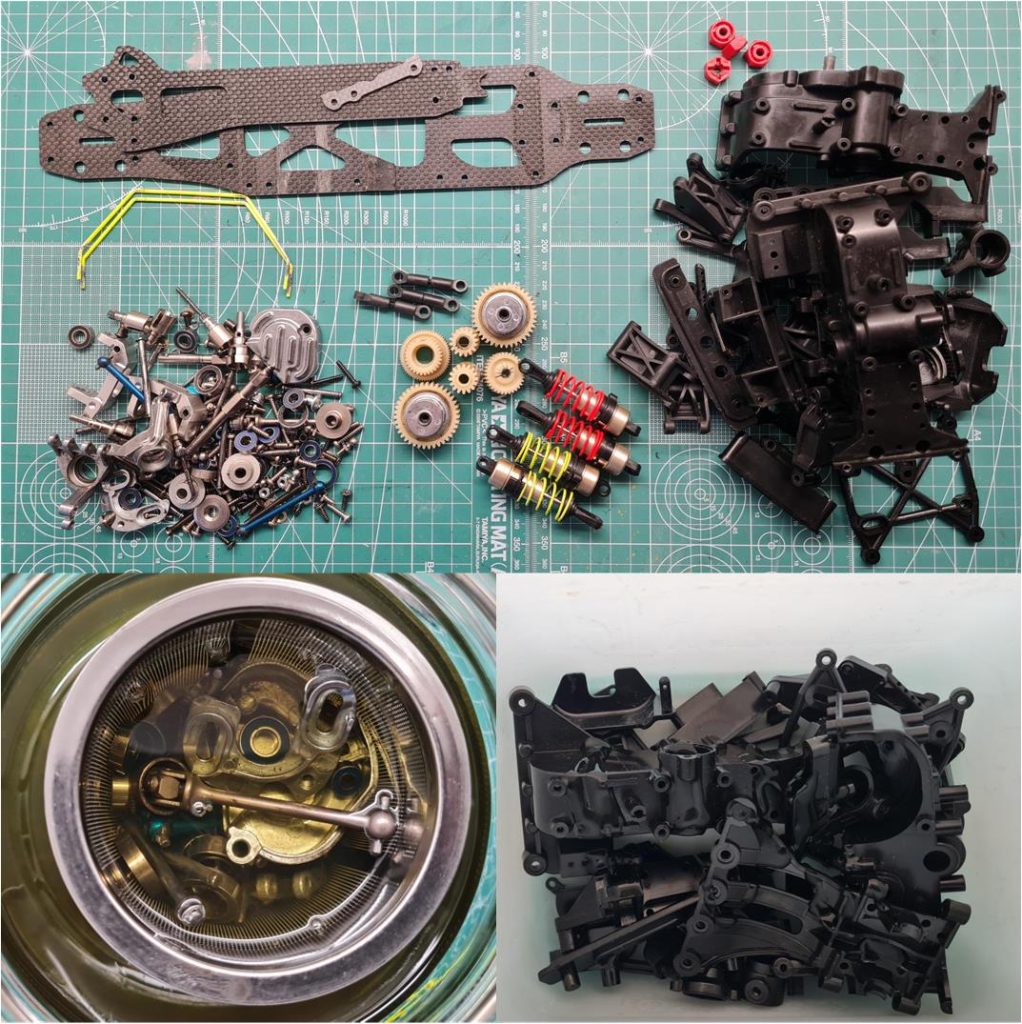
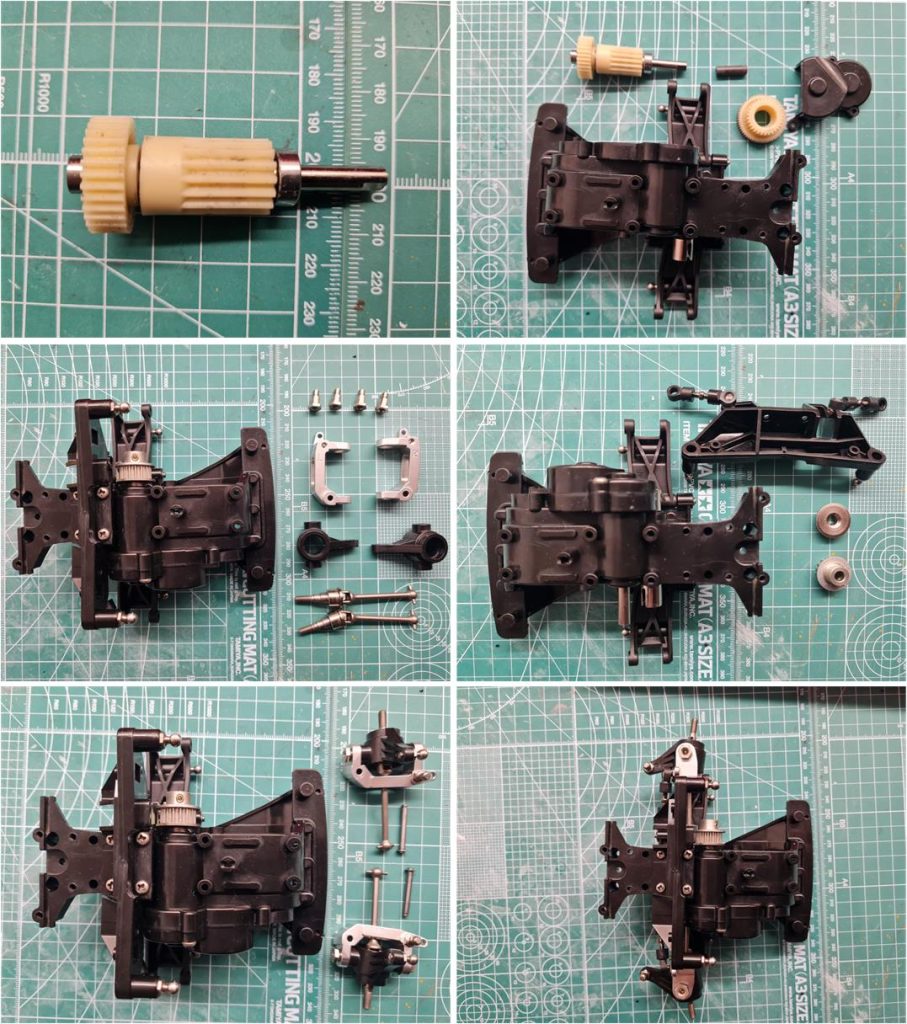
The chassis was completely disassembled, separating the parts by material: carbon, metals and plastic (image first row). The carbon and plastic parts (image on the left of the second row) were washed with hot water and degreasing dish soap; a hard-bristle toothbrush was used to clean the most inaccessible areas. The metal parts were immersed in diesel fuel for one week (image on the left of the second row).
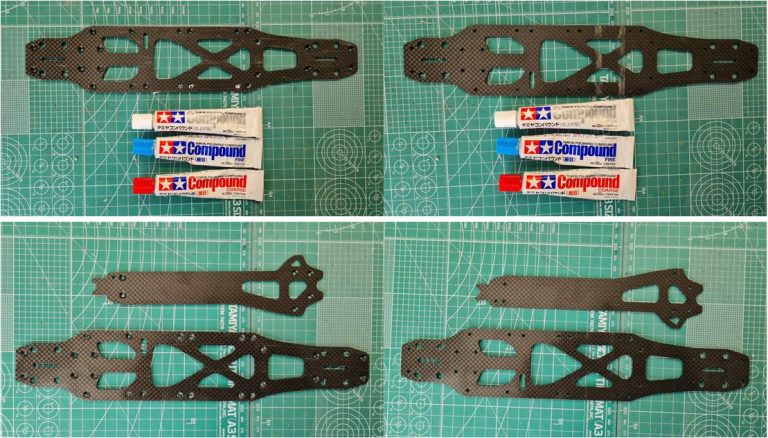
The lower side (on the left in the images) and the upper side (on the right in the images) were treated with abrasive paste to remove superficial scratches. In the first row, the chassis before treatment and in the second row, the chassis after treatment. The abrasive paste comes in three different grain sizes: starting with coarse grain and progressing to fine grain. The coarse grain reduces the depth of the scratches, which are then further refined by the smaller grains.
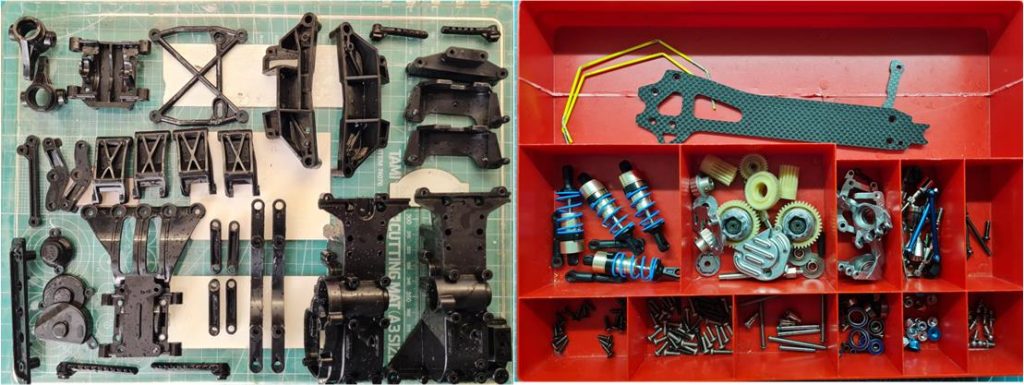
The plastic parts, after washing, were polished with the same paste used for the carbon, so the pieces without marks gained in shine and the pieces with marks returned practically intact. All parts were collected and divided by type in order to speed up assembly.
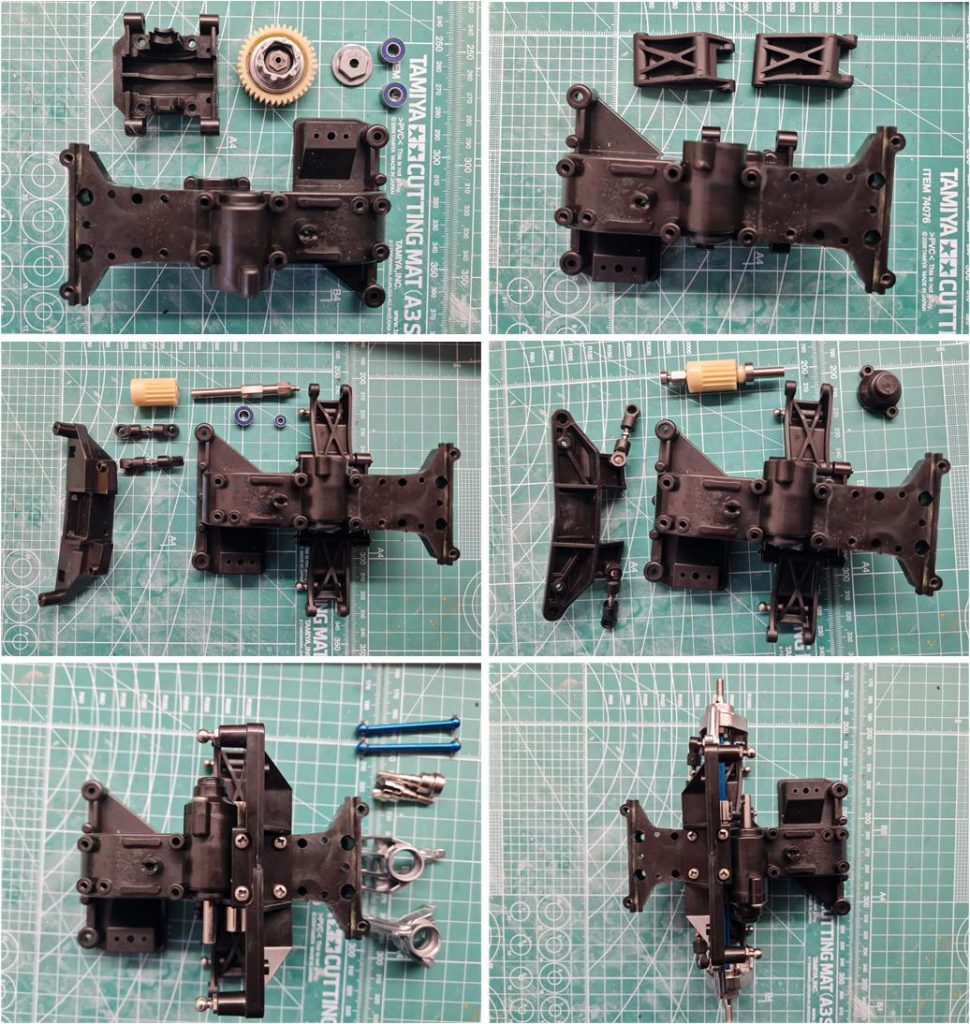
The construction of the chassis begins with assembling the front gearbox, which includes the steering system, motor and suspension. It is certainly more complex than the rear gearbox. The non-adjustable plastic upper suspension arms have been replaced with equivalent adjustable arms, set 53192 described as “4WD/FWD Upper Arm.”
To align the equipment of this chassis with factory specifications, the one-way bearing with its aluminum shaft taken from set 53299 described as “TA03 torque control unit 16/14T” was installed. The lower part of the gearbox was replaced with an equivalent new one because the original showed several scratches.
The rear section includes the gearbox and the suspension and it is much simpler to assemble compared to the front section. The rear drive shafts are a performance-enhancing accessory; they are anodized in blue and correspond to code 53305 described as “TA03 Lightweight Drive Shaft blue – 44mm/Aluminum/TA02/FF01/49091.”
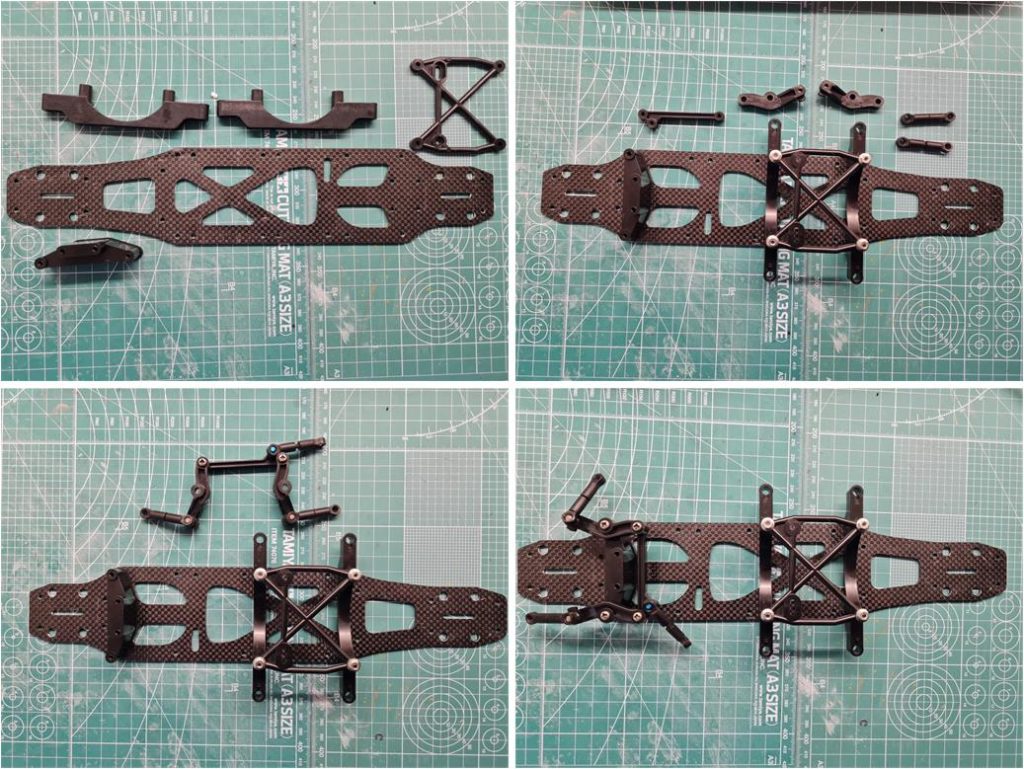
The central section is made up of two carbon plates that contain the battery holder system and the dual-link steering. The central chassis must first be built starting from the lower plate only.
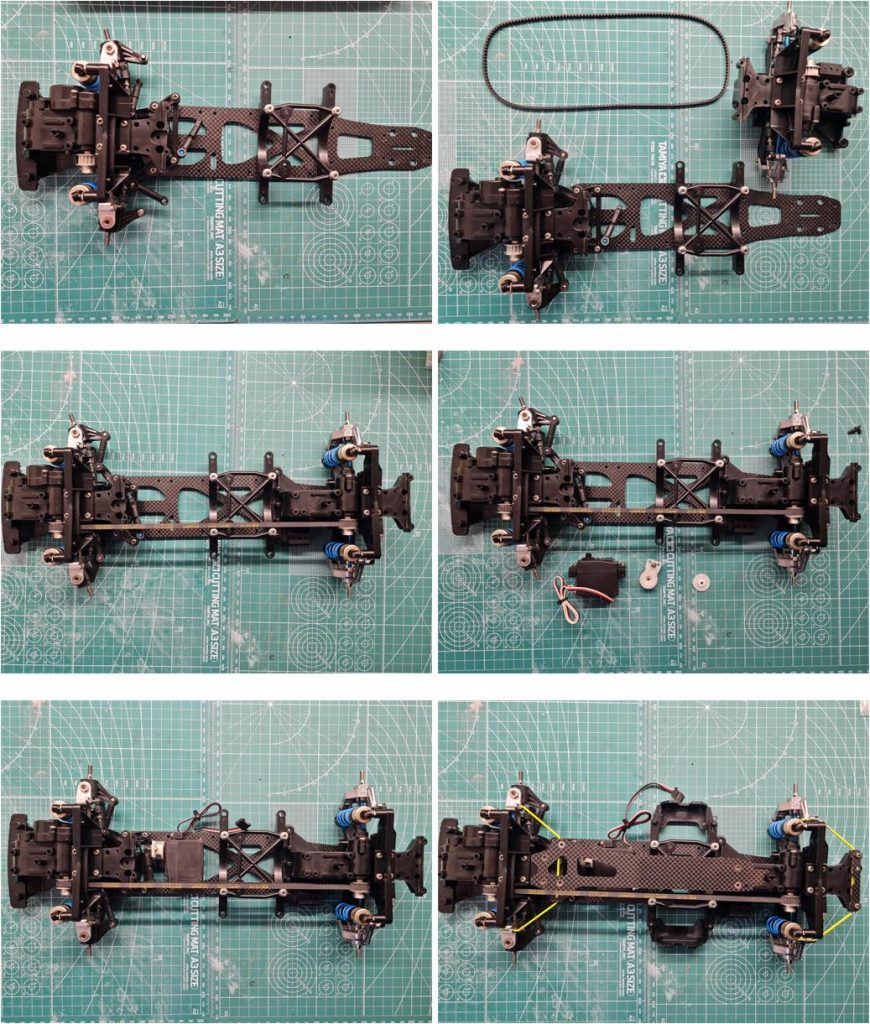
The central section is then joined with the front section. To correctly install the belt, it must be mounted together with the rear section. Before completing the chassis, the steering servo compatible with the C.P.R. P160F is installed. At this point, the stabilizer bars and the upper plate can be mounted. The chassis is ready to be fitted with the body. The tires complete with rims and the four body posts are still missing.
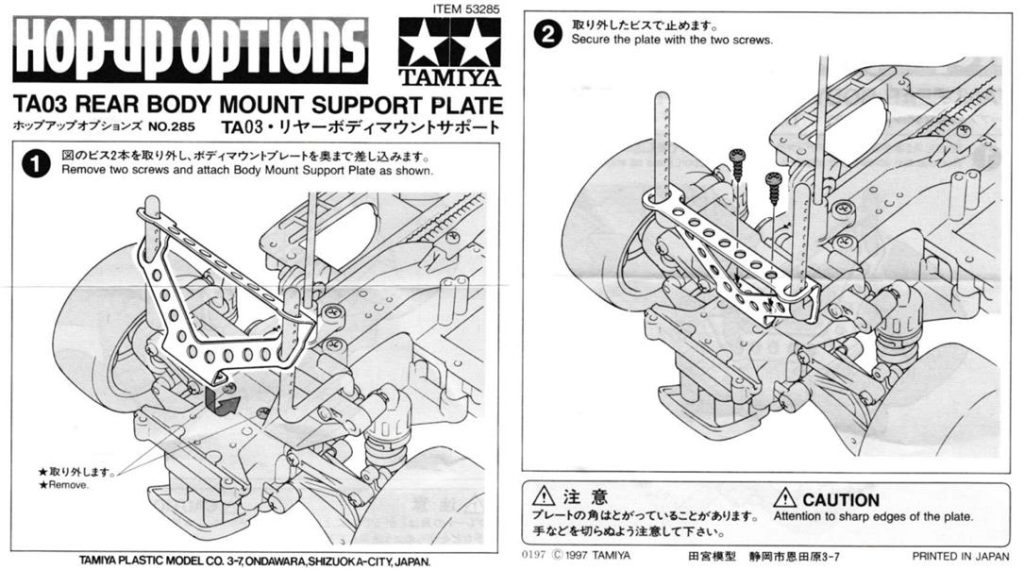
Now only the four wheels remain to be installed, consisting of tires (accessory number 50454) complete with black rims (accessory number 53335) and the metal body support accessory number 53285 described as “Rear mount body support plate.” For this model, I plan two sets of rims: the five-spoke ones from the factory package and the rims complete with OZ Racing decals suitable for finishing the body of the Alfa V6 TI Martini Racing. Manual for installing the rear body support plate, part number 53285.
The selected electronics comply with the manual’s recommendations:
– Dyna Run motor, code 53263. The motor is new and comes complete with packaging (images in the first row) – 21-tooth pinion gear, module 0.4, from set 53101 – Electronics consisting of a receiver integrated with electronic speed controller, the CPR Unit P160F (image on the right of the second row)
Restored model
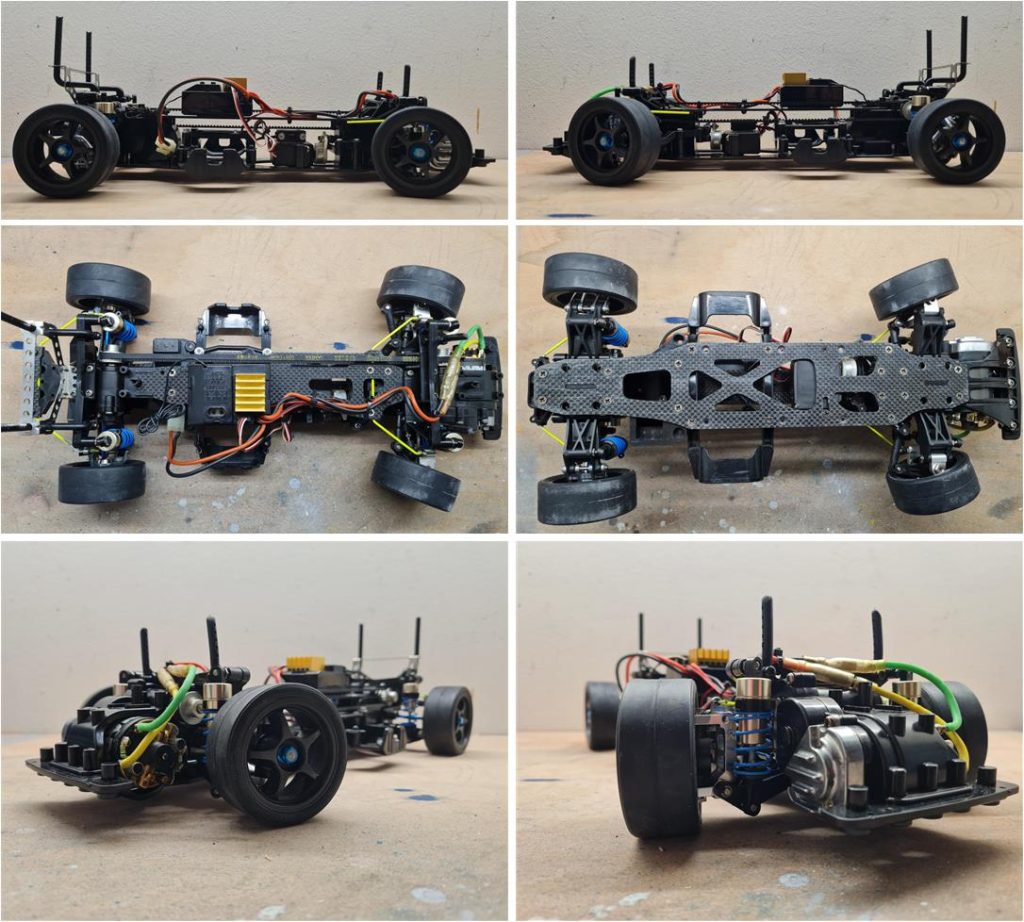
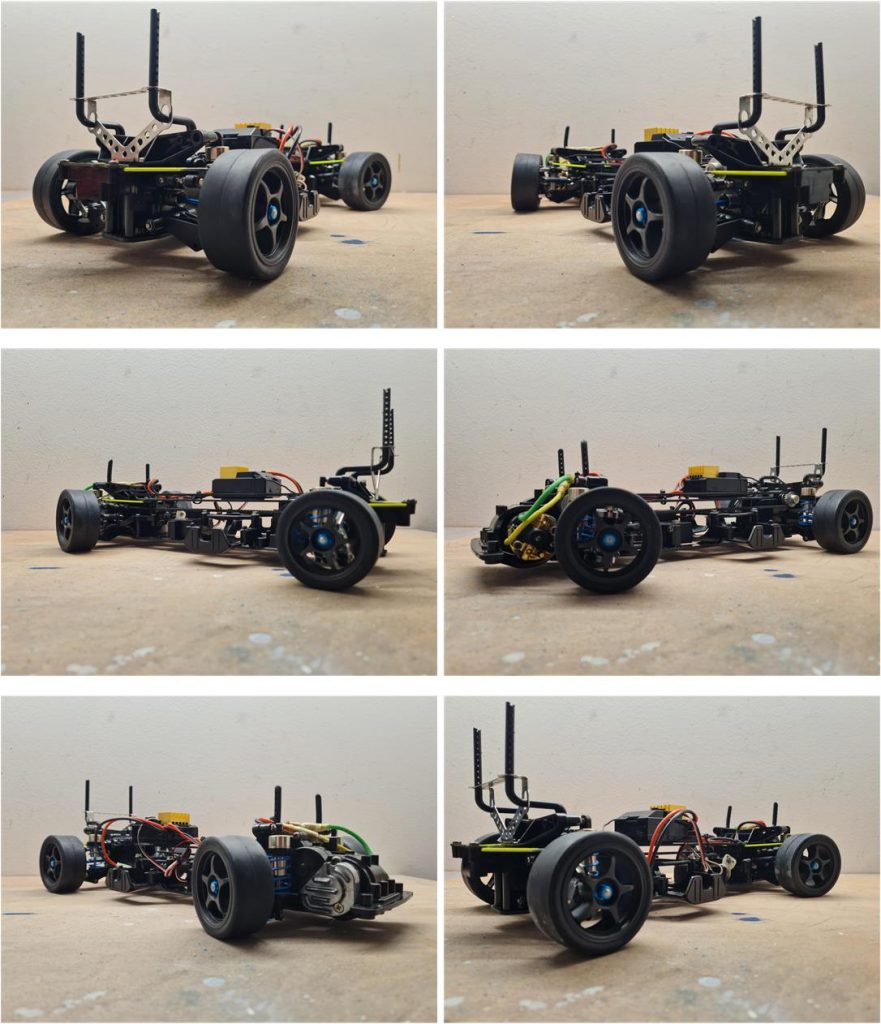
Images showing the finished model, bringing the chassis back to factory condition.
Body construction
As standard equipment the model does not include a body , there are nine bodies that today (2025) can be installed on a TA03F chassis:
– Audi A4 STW, body installed on model number 58182 – Kure Nismo GT-R, body installed on model number 58185 – Opel Calibra Cliff, body installed on model number 58188 – Martini Alfa Romeo 155 V6 TI, body installed on model number 58189 – Mitsubishi Lancer Evolution IV, body installed on model number 58199 – Opel Vectra STW, body installed on model number 58209 – Subaru Impreza WRC, body installed on model number 58210 – Mitsubishi Lancer Evolution V WRC, body installed on model number 58225 – Pennzoil Nismo GT-R (R34), body installed on model number 58239
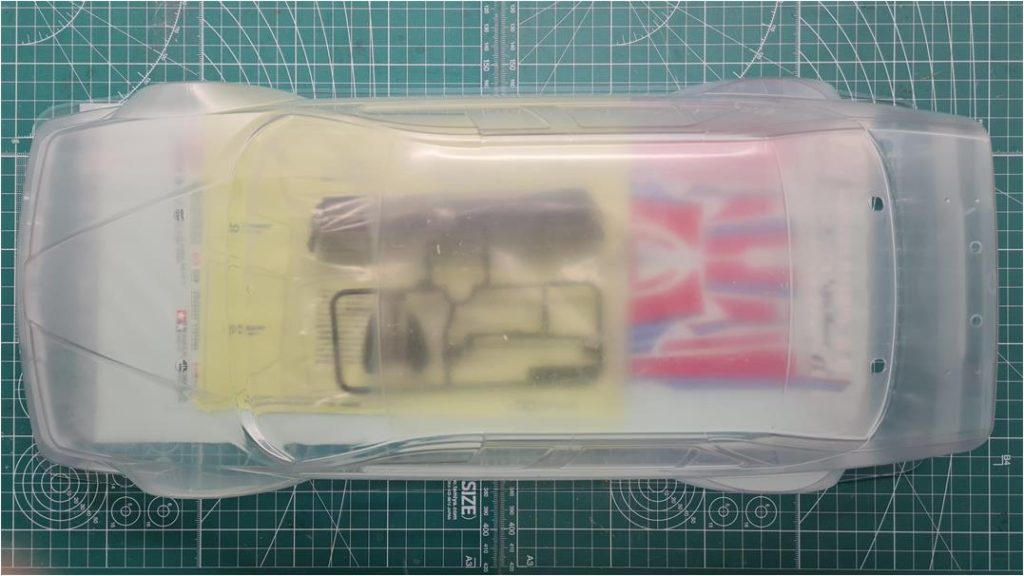
Among the options above, a body for model number 58606 has been found for sale online that fits perfectly on the TA03F chassis. Model 58606 described as “Alfa Romeo 155 V6 TI Martini 1/10” is equipped with a TT-02 chassis; as of today (2025) it has been released twice on the market, the first time in 2015 and the second time in 2023. The body comes complete with a set of decals, window masks for the cockpit glass and styrene parts to finish it (rearview mirrors and rear wing). The body alone without decals, rear wing and mirrors has code 11825159; the body complete with decals, rear wing and mirrors has code 1425519. To complete the body four rims are required (set number 50678 described as “Tom’s Exiv JTCC Wheels”) which are aesthetically similar to the OZ rims used on the real model and four racing tires (set number 50419 described as “Racing Radial Tire”).
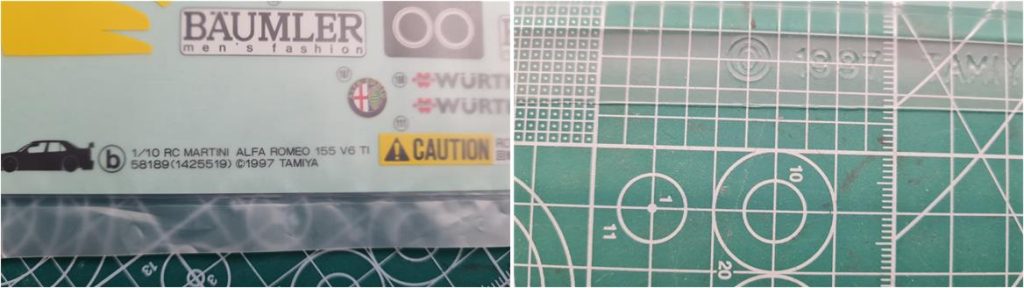
Although this body is part of a more recent set (model number 58606), it is absolutely identical to that of model 58189: the decals show the code of model 58189 (on the left in the image) and on the Lexan body the year 1997 is marked (year of release of model 58189 on the right in the image).
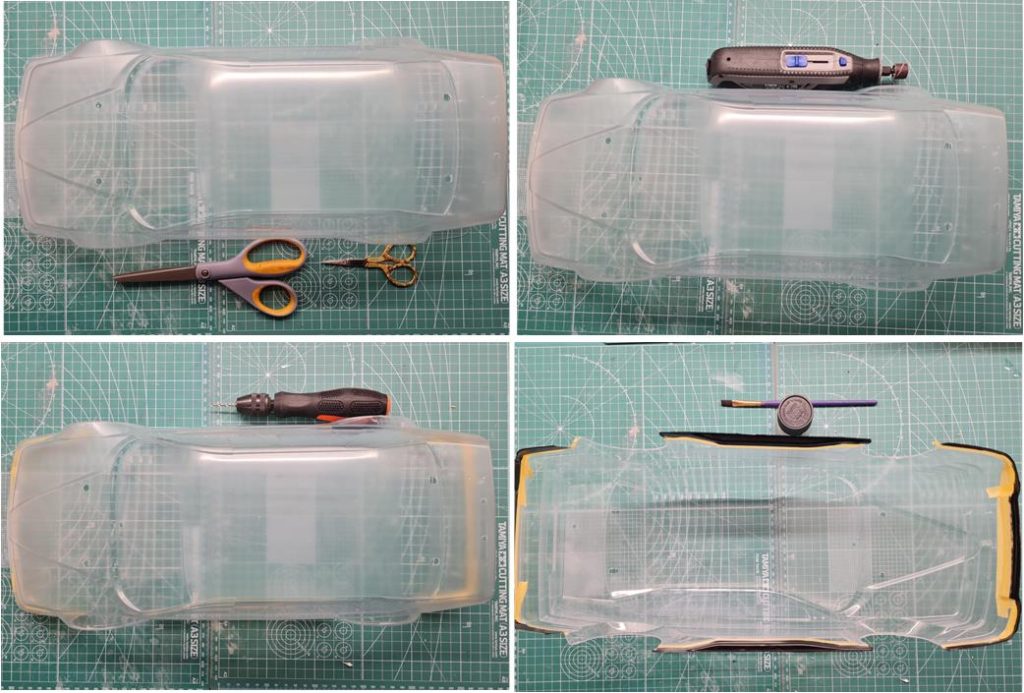
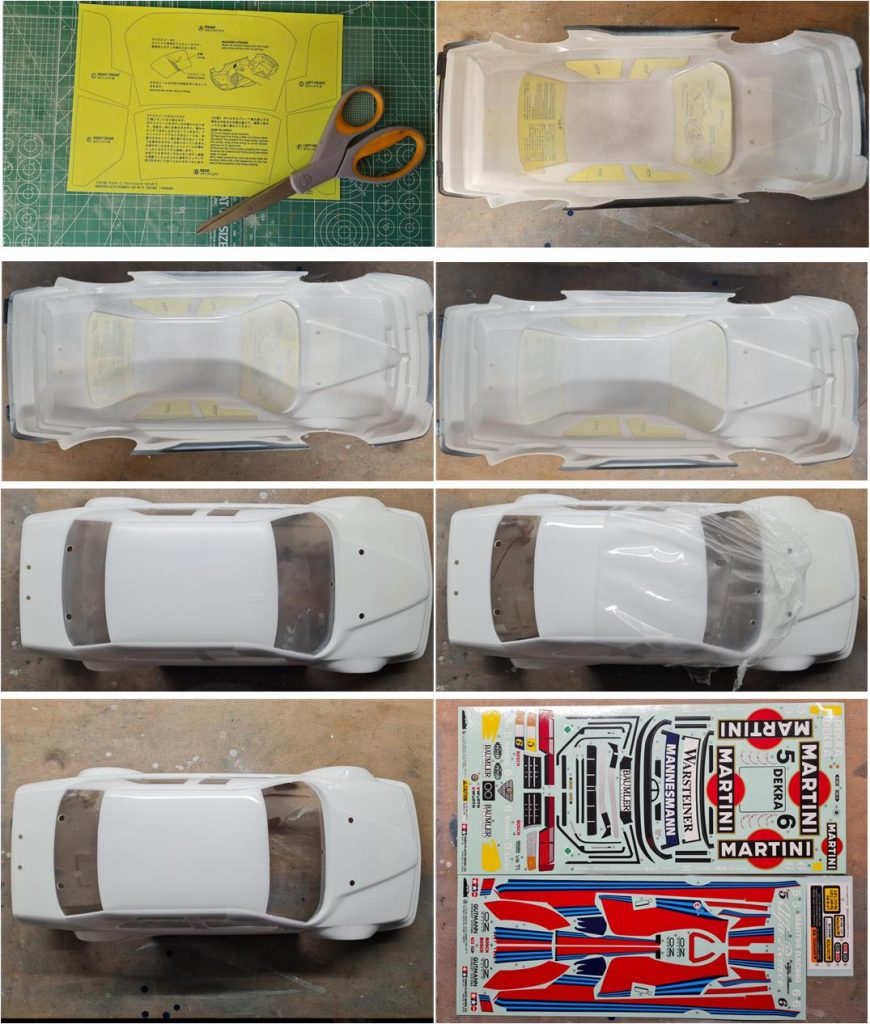
Cut the excess parts of the Lexan body following the lines printed on the plastic. Use long-blade scissors for straight sections and short-blade scissors for curved sections. Work the wheel arch with a cylindrical milling cutter and a hobby drill. Make the holes for the rearview mirrors using a hand drill and a 3 mm diameter metal or wood bit. When making the holes, place a piece of wood inside to support the body while drilling. Mask the lower part of the body to apply the black of the side skirt color PC1.
Now it is possible to cut out the masking for the cockpit windows, the sheet is included together with the decals (image on the left of the first row). Cut out and apply the masking. Close the holes for the towers, antenna, rear wing and rearview mirror screws by applying body tape externally, so that the white paint does not leak out and stain the body externally. Apply the white color PS1 with light coats first (image on the right of the first row) and then progressively heavier – wet coats (images second row). Once the white paint has been applied, remove the window masking and the external protective film of the body. The body is now ready for the application of the decals.
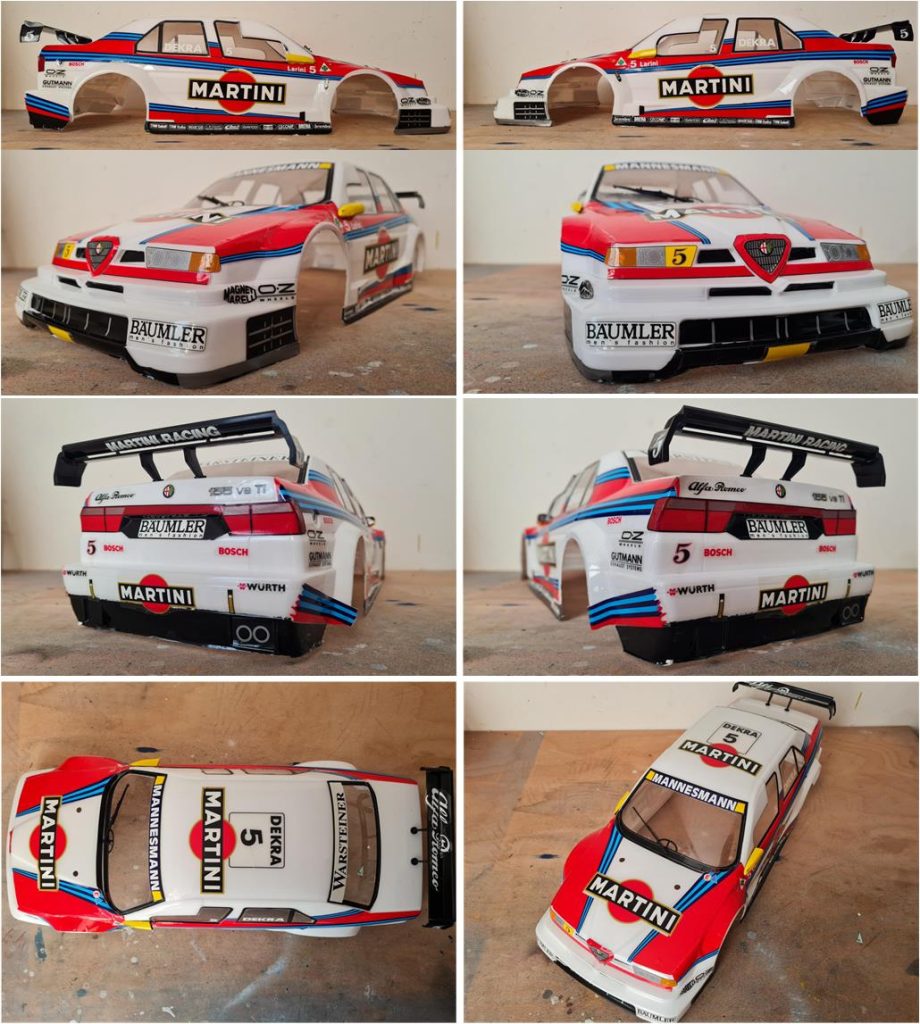
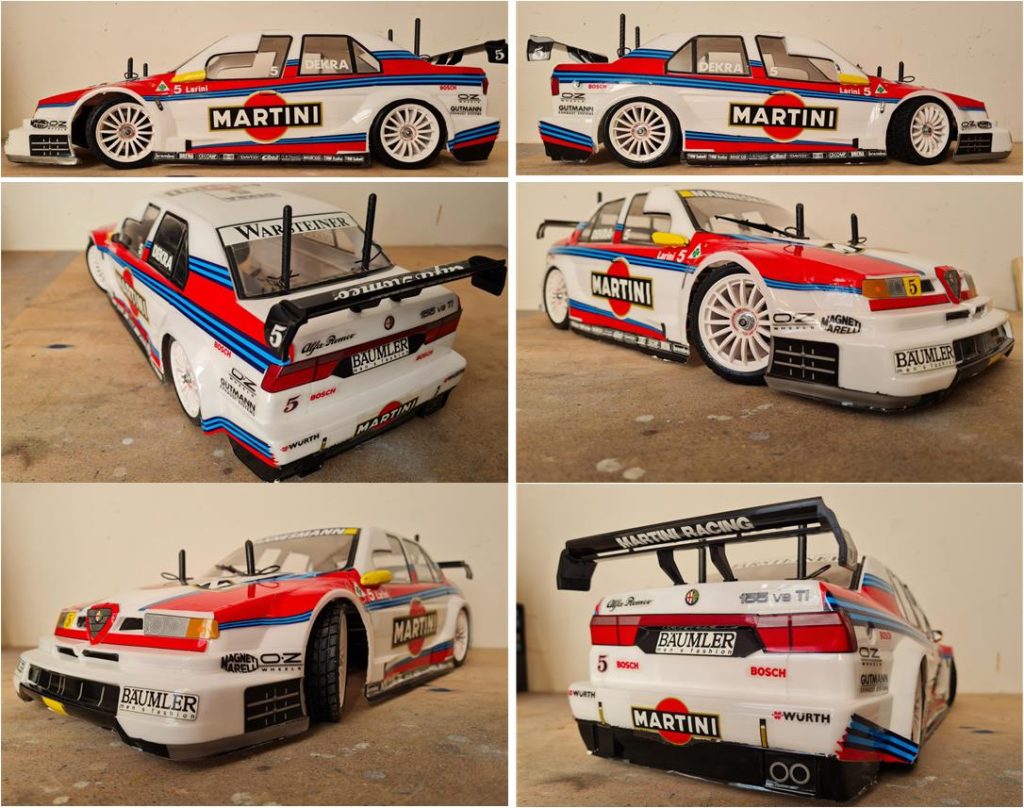
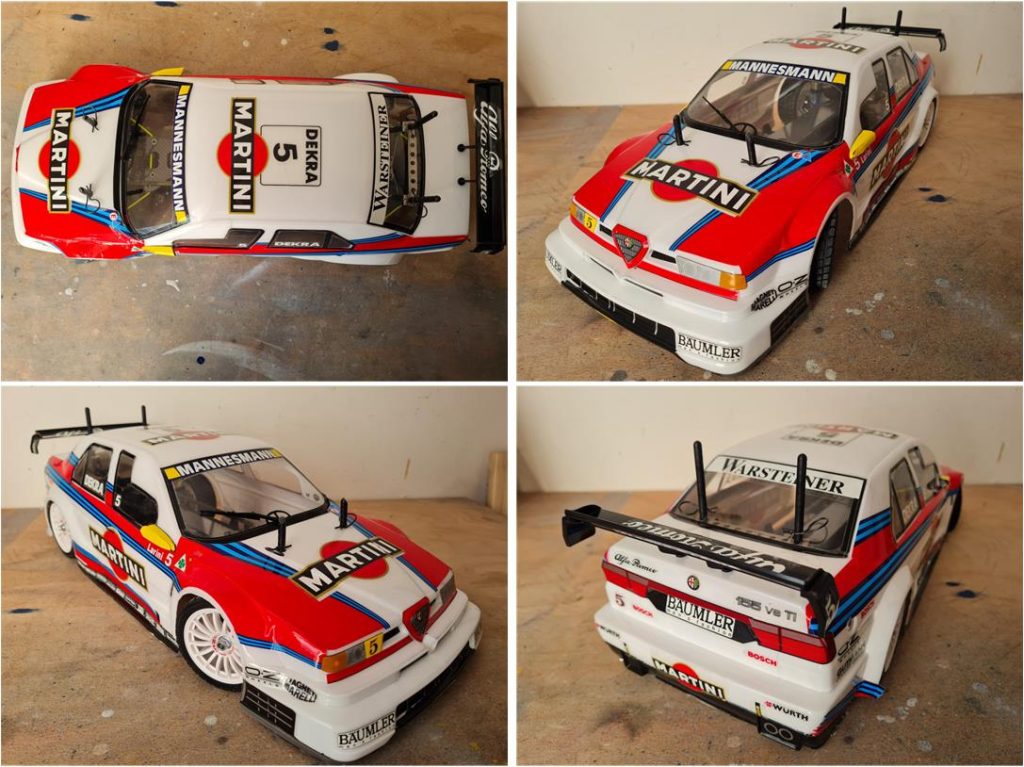
The decals of the Alfa Romeo 155 V6 Ti with main sponsor Martini Racing are numerous and large in size. Just like when building a puzzle, start from the corners and then build the border until the whole image is complete. In the same way, to apply decals of this size that cover a large part of the body, start from a corner on one side and proceed along the side. It is better to apply the decals alternating between the right and left sides so as to proceed in parallel. The sides must be symmetrical, so by applying the decals together positioning errors are avoided. Images showing the finished body.
As of today (2025) Tamiya has released these models equipped with Alfa 155 DTM body shells over the years:
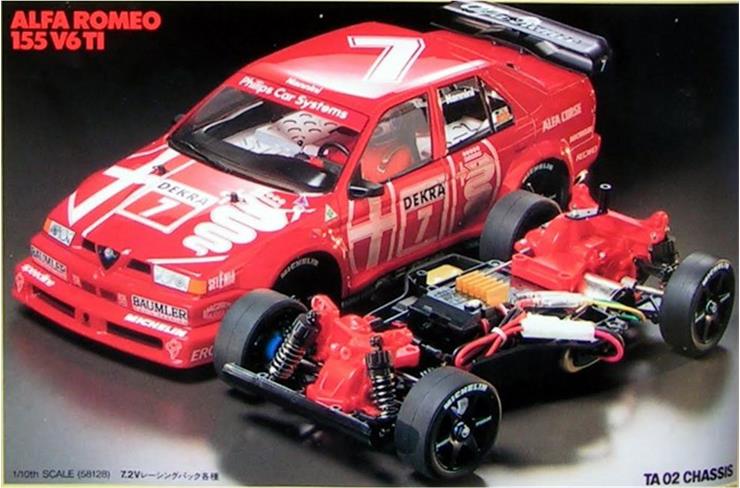
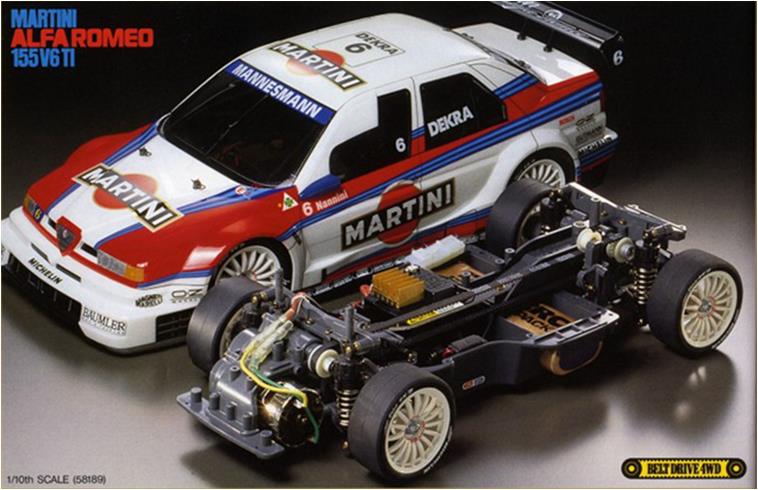
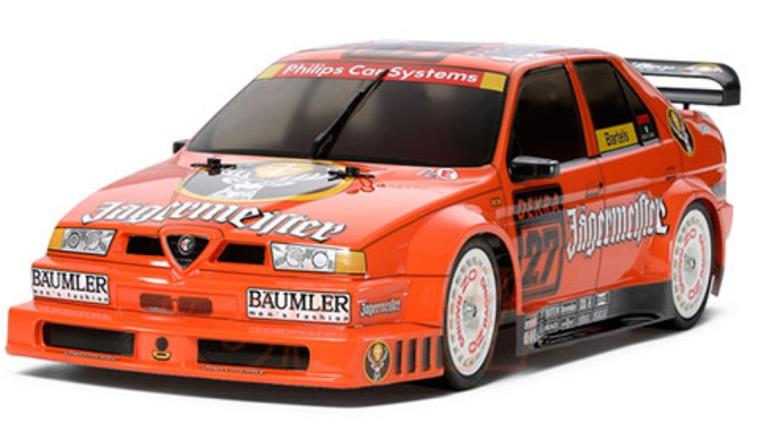
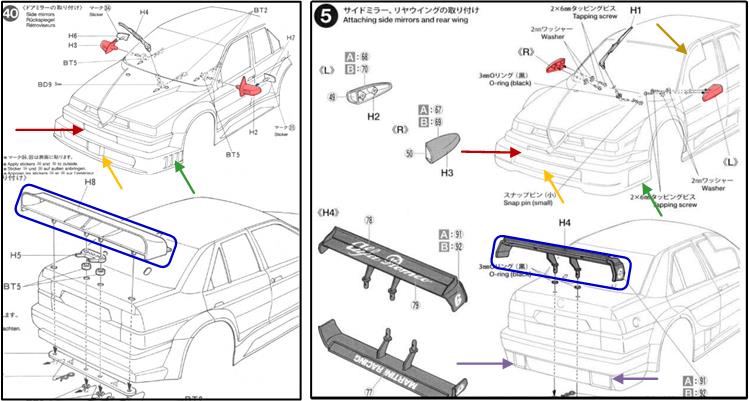
There are two different bodies for the Alfa 155 V6 TI: the first body was used on the Alfa Romeo red model and on the Jagermeister model and the second body was used on the Alfa Martini and Bosch models. In the image below there are excerpts from the body instructions: on the left the first version and on the right the second version. In races on fast tracks, the main problem for Alfa Romeo was poor aerodynamic penetration which penalized top speed, so Alfa Romeo evolved the body to improve the aerodynamic efficiency of the Alfa 155 which, basically, is a comfortable mid-class sedan that struggled to compete against coupés like the Opel Calibra which had better aerodynamics and lower ground clearance. The two bodies differ in:
– the shape of the front pillar of the front side windows on the driver’s side and passenger’s side (see brown arrow in the second image on the right only). In the second version there is a deflector with an aerodynamic function to improve the drag coefficient of the Alfa 155; top speed was one of the points where it lost against the low Mercedes 190 EVOII and later against the Opel Calibra which was a coupé with better aerodynamics, – the shape of the rearview mirrors (highlighted in red both in the image on the right and in the image on the left).
– the shape of the lower air intake on the front bumper (highlighted with an orange arrow both in the picture on the right and in the picture on the left) and the small air intake under the logo on the front (highlighted in dark red both in the picture on the right and in the picture on the left) – the shape of the engine exhausts on the rear bumper which are only present in the second version (double purple arrow on the right in the picture) and – the shape of the rear spoiler (see the two blue boxes in both the image on the right and the image on the left).
Restored model equipped with body Images showing the finished model.
Tamiya, original figure, box art, guide book and catalogue are of TAMIYA INC, which does not endose or sponsor www.tamiyaclassic.com. Any brands, logos and trademarks represented on this website are the copyright of their respective owners.